NUMARK MIXTRACK PRO

SETUP
Step 1. Connections
Connect the Mixtrack Pro with your computer using the provided USB cable.
Connect your speakers to the rear Master Output using proper RCA cables and your Headphones to the front socket.
Step 2. Drivers
No drivers are required to be installed. The Numark Mixtrack Pro is a USB Class Compliant device and your Operating system will automatically install the necessary drivers when the unit is connected to your computer.
Step 3. VirtualDJ
Install VirtualDJ 8 from http://www.virtualdj.com/download/index.html (in case you have not done already)
Start VirtualDJ and login with your Account credentials.
A Pro Infinity, Pro Subscription or Plus Mixtrack Pro Controller License is required. http://www.virtualdj.com/buy/index.html
A detection window will appear when the unit is first connected with VirtualDJ.
Click on the "Use Soundcard" button so that VirtualDJ will apply the pre-defined audio configuration (speakers need to be connected to the Master Output of the unit)
Click to OK
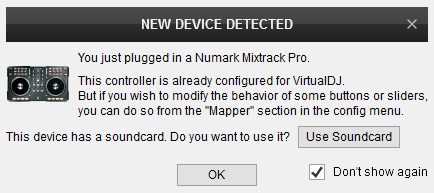
The Mixtrack Pro is now ready to operate with VirtualDJ
MIXER CONTROLS
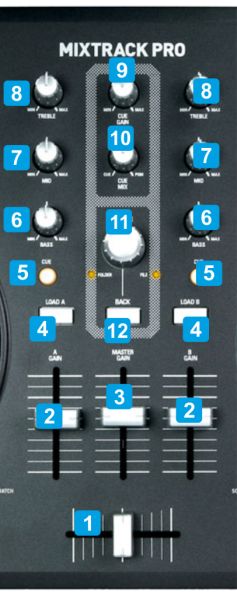
KEY
ACTION
Push to set focus to the next Browser window
DECK CONTROLS
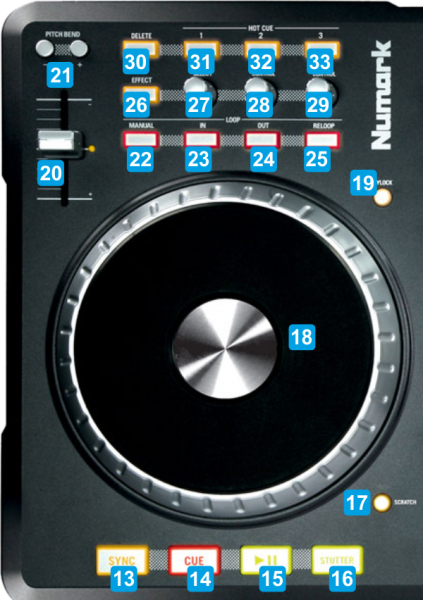
KEY
ACTION
Auto Loop mode : Half the size of the Loop
Auto Loop mode : Enable/disable an auto Loop of a selected size in beats
Auto Loop mode : Double the size of the Loop
Delete mode : Deletes Hotcue 1
Delete mode : Deletes Hotcue 2
Delete mode : Deletes Hotcue 3
